Measuring Guide
When you are knitting or crocheting a garment, such as a pullover, cardigan, vest, or tee, typically the designer offers a range of sizes. To help determine which size will be the best fit, you will need to know your body’s measurements.
Bodies come in all shapes and sizes and do not necessarily fit a standardized set of measurements. One of the great things about stitching a garment by hand is that you can make it fit the way you want, in accordance with the actual dimensions of your body.
Download our free, printable Measurements Worksheet!
Taking Measurements for Knitting or Crocheting Garments
 Here are some best practices for taking your measurements for a sweater or other garment:
- Be sure you are wearing close-fitting garments and the types of undergarments you would wear under the garment you are making.
- It’s best to have someone else measure you, if possible, since your measurements change when your arms are raised.
- When using measuring tape, be sure the tape is level. Pull it snug but not too tight.
Upper Torso Circumference vs. Bust Circumference
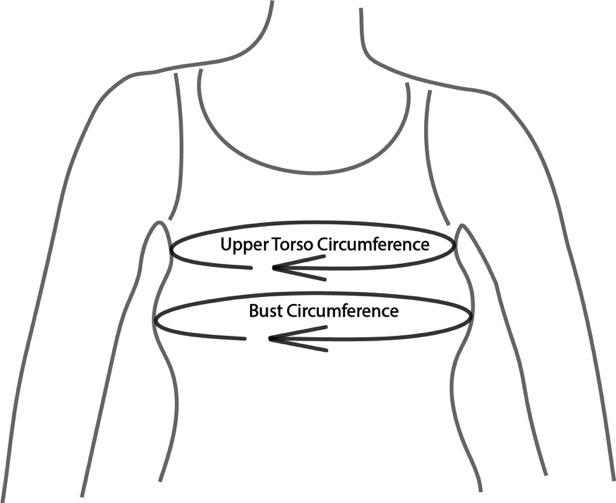
Wrap a measuring tape around your chest as high as it will go (in your armpits). Jot down that measurement, which is your Upper Torso Circumference. Upper Torso Measurement is often used to determine the sweater size that you will make.
Measure around the fullest part of your bust or chest, and jot down that number as well. This is the Bust Circumference. For some people, the fullest part of their chest may be the Upper Torso Circumference as measured above. For many others, the Bust Circumference will be larger.
Modifications for Fit
Often the Upper Torso Measurement plus the amount of ease desired in the sweater is used as the full bust size when choosing a sweater size to knit or crochet. This ensures a good fit in the shoulder, which is a difficult part of a sweater pattern to adjust.
If your Bust Circumference is greater than your Upper Torso Circumference by more than a couple inches, you may still choose your garment size based on your Upper Torso Circumference, but you may also want to consider adding bust darts. For many patterns it is relatively simple to make those adjustments, as well as other modifications such as waist shaping, lengthening/shortening sleeves, and lengthening/shortening the hem. Compare the schematic from the pattern to your actual body measurements to determine what adjustments, if any, you will need to make.
Understanding Positive and Negative Ease
Most patterns recommend a certain amount of “positive ease” or negative ease.”
- Positive ease means the finished measurements of the garment will be bigger than your actual body measurements.
- Negative ease means the garment will be smaller than your body measurements.
- Zero ease means the garment will be exactly the same size as your body measurements.
When choosing a size, you will want to take into account the amount of ease recommended in the pattern (and the pictures showing the fit), as well as your own personal preferences as to how much ease you would like in the garment.
Here's how the different amounts of ease translate into how the garment will fit:
- Up to 4" negative ease – Very close fitting – garment is up to 4” smaller than body (upper torso circumference)
- 0 - 1” positive ease – Snug fit/close fitting/body skimming – garment is almost exactly the same size as body
- 2 – 4” positive ease – Classic fit – garment is 2 - 4” larger than body
- 4 - 6” positive ease – Loose/relaxed fit – garment is 4 - 6” larger than body
- 6+” positive ease – Oversized, generous fit
Measure a Favorite Sweater to Replicate the Fit
In addition to measuring your body, you can measure a sweater from your existing wardrobe that fits the way you want your sweater to fit, to determine your personal ease/sizing preferences. Be sure to select a sweater with a similar yarn weight and fiber content.
Measuring for Socks
 When knitting socks, negative ease is usually recommended so the socks do not fall down. Typically, socks should be about 10% smaller than foot size, or 5% smaller for stranded colorwork, which is less stretchy. Socks with all-over ribbing can be up to 25% smaller than foot size.
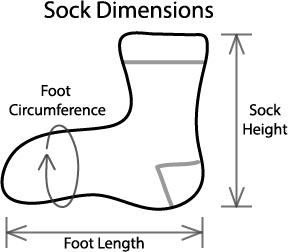
To measure your Foot Circumference, stand on the measuring tape and measure all the way around the widest part of your foot.
To measure your Foot Length, stand on the measuring tape and measure from the back of your heel to the end of your longest toe.
Interestingly, most people find that their foot circumference equals their ankle circumference.
Sock Height will depend on how tall you want the socks to be. While standing, measure from the floor to the point on your ankle or leg where you want the sock cuff to land.
Further Reading
Now that you know about negative and positive ease and how to take measurements for your knitting or crochet project, it's time to read our article about Gauge!
